installaion lower tether with retractor image

Einbau von Kindersitzen mit automatischen Spanngurten

Ein korrekt installierter Kindersitz ist entscheidend für die Sicherheit deines Kindes – insbesondere bei einem Unfall oder plötzlichem Bremsen. Diese Anleitung zeigt dir Schritt für Schritt, wie du deinen Axkid Kindersitz mit automatischen Spanngurten (Minikid 4 Max / Minikid 4 ) korrekt befestigst – je nach Fahrzeugtyp und Einbauposition.

Wenn du einen Minikid 4 Pro oder Movekid verwendest, findest du hier die passende Einbauanleitung.

Was sind automatische Spanngurte?

Automatische Spanngurte sind fest mit dem Kindersitz verbunden. Sie werden beim Einbau herausgezogen und ziehen sich nach dem Lösen automatisch wieder in die Gurtkassette zurück. Sie sorgen für einen festen Halt im Fahrzeug, weniger Bewegung des Sitzes bei Bremsmanövern sowie für zusätzlichen Schutz für Kopf und Nacken deines Kindes.

So installierst du deinen Kindersitz mit automatischen Spanngurten

  1. Verankerungspunkte finden: Suche die unteren Verankerungspunkte in deinem Fahrzeug. Diese befinden sich meist in Bodennähe nahe der Sitzschiene und sind häufig schlaufenförmig. Tipp: Schau in die Bedienungsanleitung deines Fahrzeugs. Wenn keine Punkte vorhanden sind, kannst du Befestigungsösen oder Haltegurte von Axkid verwenden, um eigene Verankerungspunkte zu schaffen.
  2. Gurte herausziehen: Ziehe die automatischen Spanngurte aus dem hinteren Teil des Kindersitzes.
  3. Metallclips befestigen: Hänge die Metallclips an einer geeigneten Verankerung ein – zum Beispiel an einer werkseitigen Öse, an Axkid Befestigungsösen oder an einem Haltegurt.
  4. Sitz fixieren: 

Drücke den Sitz nach unten und bewege ihn vorsichtig nach vorne, hinten und zur Seite. Wiederhole dies, bis er stabil sitzt und sich kaum noch bewegen lässt.

Die automatischen Spanngurte deines Axkid Kindersitzes lassen sich direkt an einer geeigneten Verankerung im Fahrzeug befestigen – zum Beispiel an werkseitigen Verankerungspunkten oder Axkiid Befestigungsösen, die zusätzlich montiert werden können. In diesem Fall musst du keine Haltegurte verwenden – du hängst den Metallclip der Spanngurte einfach direkt ein. Haltegurte brauchst du nur dann, wenn dein Fahrzeug keine passenden Verankerungspunkte bietet oder oder der Abstand zwischen Sitz und Befestigungspunkt zu groß ist (Haltegurt als Verlängerung). In diesen Fällen musst du die Haltegurte zuerst im Fahrzeug befestigen – dafür stehen dir verschiedene Methoden zur Verfügung:

Back seat installation with lower tethers (LT) for car seats:

Hinge of the front seat – method*

  • Push the lower tether through the gap between the seat’s backrest and the seat cushion.
  • Wrap the metal clip around the hinge of the front seat and extend it to the backseat.
  • Thread the metal clip through the strap slot, pull the metal clip up towards the metal clip connectors on the back of the car seat, and attach it securely. Pull the loose end down to tighten it. The car seat installation is now complete.

*Important Notice: Do not move the front seat backwards after installation, as this might loosen the tethers, compromising security.

Seat rail wrap – method**

  • Wrap the lower tether between the vehicle’s seat rail and the floor.
  • Thread the metal clip through the strap.
  • Pull the metal clip up towards the metal clip connectors on the back of the car seat and fasten the metal clip securely. Tighten the strap by pulling the loose end of the strap down, removing any slack.

**Important notice: Do not move the seat position after installing the straps. This could damage the installed tethers.
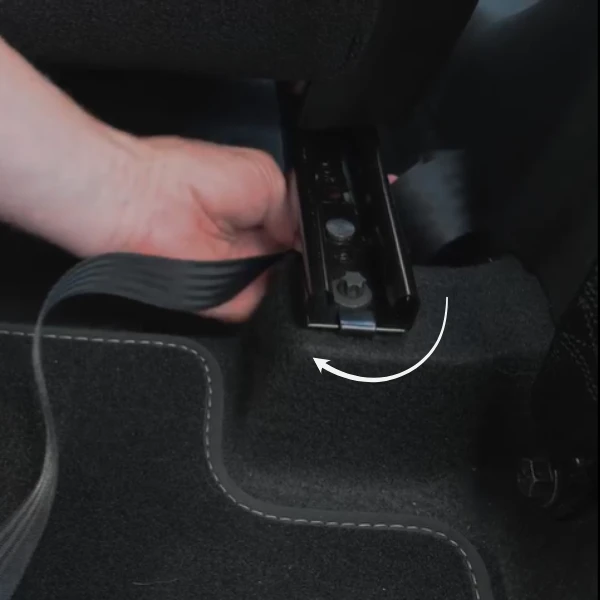
two column block installing tether under seat rail

Under seat rail wrap – method***

  • Wrap the strap of the lower tether underneath the seat rail by pushing the strap around the seat rails connecting point of the floor. For this method, the strap should pass underneath the seat rail, wrapping around the bolt or screw that secures the rail to the floor, rather than around the top of the rail.
  • Thread the metal clip of the strap through the slot on the strap.
  • Fasten the metal clip to the back of the car seat connectors. Tighten the lower tether by pulling it down, securing the car seat.

***Important Notice: This installation method prevents the seat rail from damaging the lower tether strap and allows the front seat to move freely backwards.

Einbau auf dem Beifahrersitz

Other installation methods in the front seat

  • Push the LTAS through the gap between the seat’s backrest and the seat cushion.
  • Wrap the strap around the hinge of the front seat.
  • Thread the buckle through one of the strap slots closest to the buckle making it as short as possible. Connect the retractable lower tethers to the buckle of the LTAS.

*Important Notice: Do not move the front seat backwards after installation, as this might loosen the tethers, compromising security.

  • Wrap the LTAS around the vehicle’s seat rail and the floor.
  • Thread the buckle through a designated slot on the strap, making it as long as possible.
  • Route the LTAS underneath the vehicle seat to the front of the vehicle. Make sure the lower tether comes out from the front of the seat and not from the sides.
  • Pull the retractable lower tethers from the back of the car seat and fasten them in the buckles of the LTAS coming from underneath the front seat. Push down on the top of the car seat and wiggle, which will secure the car seat in place.

**Important notice: Do not move the seat position after installing the straps. This could damage the installed tethers.


  • Wrap both ends of the LTAS underneath the seat rail by pushing the strap around the seat rails connecting points of the floor.
  • Make sure the strap is positioned beneath the seat rail and is looped around the bolt or screw that anchors the rail to the floor.
    Thread the buckle of the LTAS through a slot making the strap as long as possible.
  • Guide the LTAS underneath the front seat, making sure the straps come out from the front of the seat and not from the sides.
  • Pull down the retractable lower tethers from the back of the car seat and connect the metal clip with the buckle of the LTAS from underneath the front seat.
    Wiggle the car seat while you push down to tighten the lower tethers.

***Important Notice: This installation method prevents the seat rail from damaging the lower tether strap and allows the front seat to move freely backwards.

After installation:

Once the lower tethers with retractor or the LTAS are in place, test the car seat by giving it a gentle push forward and sideways to make sure there is no excessive movement. If the car seat shifts or moves, check the installation again to ensure the car seat is properly tightened and secured.

Summary

Review the Manual: Before you start, read both your car seats and the vehicle’s manuals. This will guide you through the specific steps for your models and ensure proper installation.
Eliminate Slack: Once the straps are attached, pull them tight to remove any slack. The car seat should not move more than an inch in any direction when you test it.
Test for Movement: After installing, push the car seat gently from different angles—side to side and front to back—to ensure it doesn’t shift or move more than an inch.
Inspect Regularly: Check the lower tether strap and anchorage points periodically to ensure they’re in good condition and properly adjusted. Replace any worn or damaged parts right away.
By understanding and properly using lower tethers or LTAS, you’re taking an important step towards ensuring your child’s safety while traveling. At Axkid, we are dedicated to making every ride safer and more secure for your family.